Kustom Checkout is a modular, all-in-one checkout solution built for merchants who want to drive conversions and keep shoppers in flow. This WooCommerce plugin gives you a seamless, embedded checkout experience—no redirects, no drop-offs.
- WooCommerce 3.7 or newer
- PHP 7.0 or newer (we support PHP 8.x)
- HTTPS (SSL certificate installed)
- A Kustom merchant account with API credentials
- A business in one of Kustom’s supported countries
- Sign up for Kustom Checkout and retrieve your API credentials.
- Download and install the plugin
- Wordpress.org: Kustom Checkout for WooCommerce
- WooCommerce.com: Kustom Checkout for WooCommerce
- Optional: Order management functionality is included in the plugin from version 2.19.0 or higher. If you have an older version, install the separate Klarna Order Management plugin to capture, refund, and manage orders directly from WooCommerce.
- Go to WooCommerce → Settings → Payments → Kustom Checkout:
- Enable Kustom Checkout
- Paste your credentials
- Configure titles, descriptions and your shipping options
- Toggle features like logging, express button, and shopper authentication
- Save changes. Enable Test Mode before launching.
Ensure that pretty permalinks are enabled in your WordPress installation.
Without this, callbacks from Kustom to your store won't work, and orders won't be updated with the correct status/information.It is recommended to enable guest checkout:
(WooCommerce → Settings → Accounts & Privacy → Enable guest checkout)To match the order total between WooCommerce and Kustom:
- Configure WooCommerce to display prices with 2 decimals.
- More info about price display and rounding issues can be found in this article.
You must specify a terms page in WooCommerce's settings.
Do not cache the cart and checkout pages, as this can cause several problems, such as:
- Incorrect prices being shown
- Order numbers getting mixed up
- One customer potentially seeing another customer’s information
The cart and checkout pages are dynamic, and caching them will make them static, leading to the issues mentioned above.
Learn more about caching and optimization here.A valid SSL certificate is required.
Your checkout page must use the Classic Shortcode block.
Kustom Checkout currently does not support the Checkout block.
You can read more about this here.
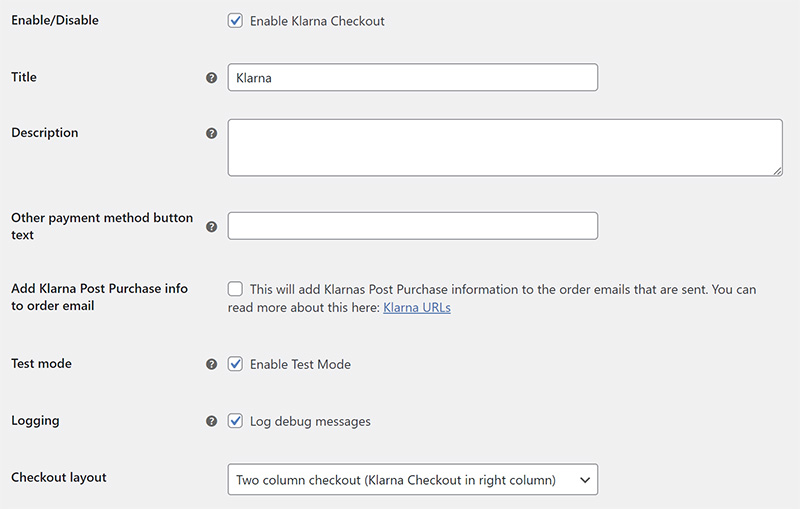
Go to: WooCommerce → Settings → Payment → Kustom Checkout
Enable Kustom Checkout: Check the Enable Kustom Checkout checkbox.
Title - Enter the title for the payment method shown in the checkout and order confirmation emails.
Description - Enter the description of the payment method displayed on the checkout page.
Other payment method button text - Customize the Select another payment method button text shown at checkout if using other payment methods than Kustom Checkout. Leave blank to use the default (translatable) text.
Add Kustom Post Purchase info to order email - This will include Kustom’s post-purchase information in the order emails.
Test mode - Check the Enable Test Mode checkbox to activate test mode using test API keys.
Logging - Check the Log debug messages box to save debug messages to the WooCommerce System Status log.
Checkout layout - Choose your preferred Checkout layout. Options include:
- One column checkout
- Two column checkout (Kustom Checkout in right column)
- Two column checkout (Kustom Checkout in left column)
- Two column checkout (Kustom Checkout in left column – Storefront light)
Activate test mode to try your integration in a safe environment. You’ll get access to test payment methods and dummy data.
What to check:
- Does the checkout render correctly?
- Do callbacks update order status in WooCommerce?
- Do logs show the expected behavior?
Once it looks good, you’re ready to go live.
If something’s not working:
- Check your merchant country and currency are matching the setup
- Review API credentials—make sure Test Mode isn’t active in live environment
- Use logs to get insight into how callbacks are handled
- Missing buttons? Some themes require checkout defaults to be enforced
Still stuck? For technical or integration questions reach out to Krokedil support. For all questions regarding a certain purchase and/or account related issues reach out to our support@kustom.co
How is Kustom Checkout different from Kustom Payments?
Kustom Checkout is your all-in-one checkout solution—fully embedded, with one agreement and one payout.
Kustom Payments is a feature you add to your existing checkout when you only need a single payment method.
If you’ve completed your sandbox tests and are ready to launch:
- Switch to Live Mode
- Verify your credentials
- Run a test purchase in production
- Track orders and shopper activity in the Kustom Portal
Need help with integration or want to explore features? You’ll find everything at docs.kustom.co.
When running Kustom Checkout on an open source platform, the responsibility for ensuring your configuration, platform version, and any third-party code are supported sits with you — read more here or reach out to merchant@kustom.co before going live.